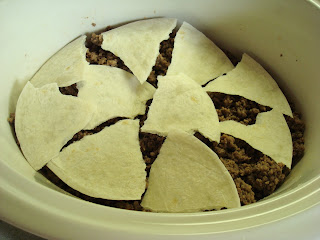
I found this recipe at creative homemaking, and since my family loves mexican food, I figured it would be a hit. It's also a crockpot meal, and you know how I love my crockpot!
Tortilla Stack
1 lb ground beef
corn or flour tortillas (your preference), cut into 6 wedges
2/3 can undiluted cheddar cheese soup (I didn't have this so substituted with shredded cheese and some salsa for liquid)
1 pkg taco seasoning mix
2 medium tomatoes, chopped
Brown hamburger and drain grease. Layer hamburger in bottom of crockpot. Top with tortilla wedges.
Recipe then calls for you to mix the cheddar cheese soup and taco seasoning in a small bowl and layer some of it on top of the tortilla wedges. Since I was substituting, I sprinkled cheese on top of the tortilla wedges, sprinkled some of the taco seasoning on, and then poured a thin layer of salsa on top of that. Sprinkle some of the chopped tomatoes on top (I skipped this step since there were tomatoes in the salsa).
Repeat layers until all ingredients are used up. Cover and cook on low 4-5 hours. Serve with sour cream, shredded lettuce, olives, or other condiments.
Verdict: all the family loved it, it was super easy, and I will definitely make again!
Wednesday, December 30, 2009
Wednesday, December 16, 2009
Oatmeal Jam Cookies
Oatmeal Jam Cookies
Mix together in very large bowl:
1 1/2 cups butter
1/2 cup white sugar
1 cup brown sugar, packed
2 eggs
1 tsp vanilla
Add:
2 1/2 cups flour
1 tsp cinnamon
1 tsp baking soda
1/2 tsp salt
2 cups oatmeal
Mix well. Place a dollop of dough on greased cookie sheet. Put about 1/2 tsp of jam on top of dough, and top this with a 1/2 tsp (or less) more of dough. Bake at 350 for 8 minutes. Jam will appear as a "ring" around top of cookie after baking. You can make these any time, of course, but they look especially festive at Christmas time! Enjoy!
Monday, December 14, 2009
The Mother of all Garlic Presses
And just what is in this unassuming little box you ask? Why, just the mother of all garlic presses, the most awesome and amazing garlic press EVER!!! Why am I devoting a whole post to a garlic press you ask? Well, because I am in love with my new garlic press and I LOOK for ways to use it whenever I can. We are eating a lot of garlic these days. :-)
My old garlic press broke over a year ago, and at first I just couldn't find a suitable replacement, then my husband got laid off and I couldn't afford to buy one even if I'd found it. I chopped garlic with an old fashioned knife whenever a recipe called for it. Then one recent day in the mail I received this FANTASTIC garlic press from a culinary minded friend of mine who had remembered I didn't have one. And my life has been forever changed. At least the part of my life that I spend in the kitchen. Which is a lot.
This wonderful little garlic press is made by Pampered Chef. It is stainless steel and so easy to use. The garlic just fits into it like so:
and then you squeeze out the garlic-y goodness like so:
and rinse it out under running water, and clean up is done! If any pieces of garlic do get stuck in the holes, it comes with this handy little "brush" (only the bristles are hard, not soft) that lives right there in the handle so you always know where it is
and it lines up perfectly with the holes in the bottom of the garlic press so it can press out any clinging pieces of garlic. Voila!
I am relatively certain that this will be the last garlic press I ever need. If you are in the market for a garlic press, you need to get one. In fact, even if you are NOT in the market for a garlic press, you need one of these. :-) If you have a loved one that is hard to shop for but they like to cook, get them one too! And no, I am not receiving a commission for advertising a Pampered Chef product on my blog, I'm just giving them free advertising because they hit it out of the ball park with this garlic press and I really, really love it! Thank you my friend!
Tuesday, December 8, 2009
Christmas Candy - Reindeer Chow
This is chocolate covered Crispix cereal and is super easy to make. My children call it puppy chow, but at Christmas time it was suggested we call it reindeer chow instead!
Ingredients:
box of Crispix cereal
small bag of chocolate chips (I forget the ounces, but it's smaller than the 24 oz bag, maybe 16?)
1/2 cup peanut butter
powdered sugar
The original recipe I had said to use "half a bag of choc chips" and "half the box of Crispix", but we doubled it because it was easier to use the whole bag or box, and that meant we made more each time! In doing this, however, it is important to add the Crispix to the chocolate/peanut butter mixture in stages and stir each portion well so that all the Crispix pieces are covered with chocolate. If you just dump the whole box in it will be very hard to mix up.
First, melt the choc chips in the microwave for one minute. Stir them up and melt for one minute more. Stir them up again.
Add 1/2 cup peanut butter, stir again, and then start adding your Crispix.
Put portions in a large ziploc, dump in some powdered sugar, and shake to coat. You should do this step in stages too, to make sure that all the chocolate covered Crispix is coated with powdered sugar.
Voila! Reindeer chow! It is *so* good and fun to munch on!
Christmas Candy - Orange Balls
These are delicious, orange flavored morsels of goodness! And very easy to make.
Ingredients:
one box vanilla wafers
one stick butter
one 6 oz can frozen orange juice concentrate, thawed
powdered sugar
3/4 cup finely chopped pecans
Put the vanilla wafers in a large ziploc and start beating them into small pieces with your rolling pin or some other heavy wooden object. This is really fun!
Dump the wafers into a large bowl and add the butter, orange juice, pecans, and about 2-3 cups of powdered sugar. It should be moist but not so moist it is sticking to your fingers. It needs to be able to stick together in ball shapes, so if it's too moist add more powdered sugar.
Shape into balls the size of large marbles, and roll in more powdered sugar.
Voila! Orange balls!
Monday, November 23, 2009
Thanksgiving Recipes
What is your menu for Thanksgiving dinner? Besides turkey and mashed potatoes, here are a few of our favorites:
Cranberry Relish
This is super easy, tastes like an amazing combination of sweet and tart, and we love to make it for my father in law who loves cranberries. I learned of this recipe two years ago and it has become a regular part of our Thanksgiving dinner.
1 bag cranberries
1 cup sugar (this year I'm using sucanat instead of white sugar)
1 orange or tangerine (do not peel)
1 cored apple
Blend all ingredients together in blender or food processor and chill.
Walnut Broccoli
This is called walnut broccoli because of the small amount of walnuts included in the topping. Their taste is barely discernible, but if you don't care for walnuts, or someone you love is allergic to them, you can just as easily leave them out and it won't alter the overall flavor. This is NOT a low-fat recipe! It contains lots of butter, which means it's really good. :-)
Grease bottom of 9x13 pan. Steam two or three (depending on size) packages of frozen broccoli and spread in greased pan. Be sure to not over-steam ~ it should be barely done. In saucepan, melt 1/2 cup butter. Take from heat and blend in 4T flour and 1 1/2 T powdered chicken stock base. Gradually add 2 cups milk. Return to heat and cook until smooth and boiling and thickened. Pour this sauce over broccoli in 9x13 pan. In saucepan (I use the same one I just used, and I don't even rinse it out) heat 1/3 cup water and 6 T butter. Remove from heat. Add 2/3 package of Pepperidge Farm Herb Seasoned Stuffing Mix and 1/2 cup chopped walnuts. Stir well. Top broccoli/sauce with stuffing mixture. Bake at 400 for 20-30 minutes. Can be prepared ahead of time and baked just before serving. Sorry no picture, but it looks pretty and tastes even better!
Cran-Raspberry Pie
I first made this about 10 years ago after seeing it in a magazine. My goal that year was to make a really scrumptious dessert that would be like the ultimate capstone to a delicious meal. It worked!! My husband's uncle, who is very sparing with his compliments, raved about it and I decided then and there to make it every year.
Pie Crust
Use prepared crust or make your own using favorite recipe. Here's mine:
Mix 2 cups flour and 1 tsp salt. Cut into this mixture 1 cup butter until pieces are the size of small peas (I literally cut the butter in using two knives). Sprinkle 1/2 cup COLD water (must be cold!) over mixture and mix lightly with fork. Best to add a little water at a time until you've reached the 1/2 cup mark, as humidity can affect the total amount of water needed. Add a bit more if it's really dry where you live, a bit less if it's really humid. Form dough into two balls. Roll out one ball for bottom crust and one ball for top crust.
Pie Filling
In large bowl add the following ingredients:
Undrained 1 1/2 cups frozen red raspberries, thawed
1/4 cup quick cooking tapioca
1 12oz package (3 cups) cranberries. Can coarsely chop if preferred, I leave mine whole.
2 1/2 cups sugar (I add barely 2 or slightly less)
1/2 tsp almond extract
Stir till well mixed. Let stand at room temperature for 15 minutes. I actually do this step first and then make my pie crusts while this is standing at room temp.
Pour fruit mixture into bottom pie crust. Roll out top crust and lay on top. Fold top crust under bottom crust and flute edges. Make small heat vents in top crust and brush the whole top lightly with milk. From scraps of pie crust, cut out small hearts and/or stars with cookie cutters and lay on top of crust so that each piece will have a heart or star when pie is cut. Brush cutouts with milk also. Lightly sprinkle top with sugar. Cover edges with foil. Bake at 375 for 30 minutes. Remove foil. Bake for 20 to 30 minutes more, or until top is golden and juices are clear. IMPORTANT WARNING: This pie makes LOTS of juice ~ be sure to place pie pan on cookie sheet when baking so if juices run over they won't burn on the bottom of your oven and smoke up your kitchen. Don't ask how many years it took for me to remember this.
If you look closely at this picture you can see the children are placing the heart cut-outs on top of the pie. This is VERY sweet, but the sweetness is balanced by the tartness of the cranberries, and it's a winner with anyone who loves berry pies.
Saturday, November 14, 2009
Taco Soup
This was super easy to make, and everyone liked it. A winner! It's another one from the Happy Housewife.
Taco Soup
1 lb ground beef (or turkey, or can go meatless for the vegetarian version)
1 packet taco seasoning
1 can diced tomatoes, or about 3 fresh ones chopped up with 1 T Italian seasoning mixed in
1 15 oz can tomato sauce (I used a 32 oz jar)
1 can black beans, rinsed and drained
1 can kidney beans, rinsed and drained
1 can corn or 1 small pkg frozen corn (which is what I used)
shredded cheddar cheese - as much or as little as you like
plain yogurt or sour cream - again, as much or as little as you like
avocado, chopped - optional
Frito Lay corn chips
Brown the meat, drain fat and add taco seasoning. Add all other ingredients and cook til heated through. Let simmer for 15 minutes. You can add water if you want to stretch it a bit further. If you add water, it will look more like soup, without the water it looks like thick stew.
I didn't have any chips so left that ingredient out, but my family would have loved it if I'd put corn chips in! The other 3 of the last 4 ingredients I added directly to the soup, but you can use them as a garnish if you'd prefer, or if anyone in your family has dairy allergies (add to individual bowls instead). This was a winner with everyone - will definitely make again!
Thursday, November 12, 2009
Homemade Pizza Crust
I have made my own pizza crust many times, and it was okay, but I recently discovered this new recipe for pizza crust at The Happy Housewife's blog, and it is FANTASTIC! It is my new favorite thing to make. It is also much, much cheaper and healthier than store bought pizza or Little Caesar's, depending on toppings.
Pizza Crust
1 1/2 cups hot water
1/3 cup olive oil
1/3 cup honey
2 tsp salt
4 to 4 1/2 cups flour (whole wheat, white, or a mixture of both)
1 T yeast
2 T Italian seasoning
1 T garlic powder
Mix together in bread machine on the dough setting, in your Kitchen Aid or Bosch mixer for about 5 minutes, or mix and knead (5-10 minutes) by hand. Let rise until doubled. Spread in pan and build your pizza!
This recipe makes enough for two large rectangular pizzas. Enjoy!
Tuesday, October 6, 2009
Breakfast Pizza
Or homemade Egg McMuffins!
I saw this recipe for breakfast pizza on the happy housewife blog, and thought it would be easy and fun to make. I thought I would try to cook everyone's scrambled egg in a nice little circle (like at McDonald's) so it would easily stay on the bottom bun, so I came up with the idea to use canning jar rings as "holders" for the scrambled egg mixture to cook inside of. Well, don't go rushing off to buy canning jar rings for this purpose because it didn't work. The egg mixture leaked out of the bottom of the rings almost completely. So I just scrambled them like usual and most of the children put a top bun on the pizza to help hold the eggs in.
Layer on homemade buns:
sausage patty
scrambled egg
a touch of grated cheese
Eat with a top bun, or without, your choice.
Easy Peasy! All the children loved them and thought it was a fun breakfast!
Friday, October 2, 2009
Homemade Hamburger Buns
This recipes uses regular bread dough for the hamburger buns (which has no dairy in it by the way). Regular bread recipe can be found here. Whether you are using a mixer or kneading by hand, take about half the dough (the amount you'd use for two loaves of bread) and instead of placing in bread pans, shape into buns. Let rise for an hour on greased cookie sheets.
Bake for approximately 30 minutes at 350. If you bake a sheet on each oven rack, check to make sure the ones on the lower rack are not burning on the bottom. Let cool.
After cooling, slice and wrap individually in saran wrap. Then put in freezer bags and freeze until use. I have found through trial and error that double wrapping before freezing insures soft, delicious bread or buns after thawing.
Tuesday, September 29, 2009
Split Pea Soup
Someone graciously gave us a ham this summer, and I dearly love ham! I love it because it's delicious, but also because you can do so much with it. We ate ham meat for two dinners, used it to make several lunch sandwiches, froze two baggies of cut up ham to use in other recipes, and I made soup with the ham bone. It is very easy to make and there are long periods of time when you don't need to be in the kitchen, but it is an all day thing, so plan accordingly.
Split Pea with Ham Soup
In large stock pot, cover ham bone with water and slowly bring to boil. Reduce heat to a simmer, cover, and let simmer for 2-3 hours (3 is better if you have the time, but I've done it for only 2 and the soup was still delicious!). Add a bit of water if necessary. The water will become your soup base, so you don't want to let it all boil off. When ham bone has finished simmering, pull out of water with tongs and let cool on cutting board. Strain the water that is left in your stock pot for fatty deposits or bits of gristle.
Cut up:
carrots
onions
celery (optional)
Add these to the water and bring to boil again. Cut any clinging ham meat off the bone after it's cooled, and add this to the soup. Throw bone away. Add in other ham meat if desired. Add 2-3 cups of dried split peas (3 if you want thicker soup). Reduce heat and let the soup mixture simmer again until split peas are soft and mushy (about 1.5 to 2 hours). Salt to taste. Eat and enjoy!
Sunday, September 6, 2009
Canning Peaches
Don't those jars of golden peaches look so yummy??!
I will confess that I am not a canning expert, and by myself I have only ever canned peaches. I don't own a pressure cooker, so all my canning must be done by hot water bath, and peaches is perfect for this method. So every fall for several years, I have canned peaches.
Though I don't know much, what I do know I freely share! :-)
The key to successful water bath canning is that everything be hot. The liquid you pour into the jars, the lids and rings, and the water for the "bath". Everything needs to be hot so that the lids will seal properly. In all my years of canning peaches I have never once had a jar not seal, though some took a few hours to seal completely. To start, fill a 2 or 3 quart pan with water, lids and rings, and begin heating. Also begin heating a large pot of water with a small amount of sugar added. I fill an 8 quart stock pot nearly full and add only about 1/2 cup of sugar (I am very light on the sugar). This will become your peach juice after you pour it over the peaches. And also fill a large water bath canning pot about half full of water and begin heating that as well. Then soak the peaches in warm water. This makes the skins peel off easily.
After you have peeled and halved the peaches, you'll have a bunch of jars lined up like the picture below. Behind them you can see a small pot on the back burner filled to overflowing with lids and rings, and the stockpot on the front burner. Dip a pyrex measuring cup (or whatever you want to use) into the stock pot of sugar water and pour some into each jar, leaving only 1/4 inch of air at the top.
Immediately take a lid and ring out of their pot with a set of tongs and cover each jar. Place them into the rack inside your large canning pot. My rack holds 7 quart jars at once.
Lower the rack into the hot water (use hotpads!!), cover, and bring to a boil. Once you have a nice rolling boil, let boil for 20 minutes. When the time is up, bring the rack back up and hook over the tops of the pan so it's easier to get each jar out. Using canning jar tongs, take each jar out of the rack and set on a cooling rack (or a bunch of towels) to cool. The lids don't all seal at once, so don't be discouraged if you can depress the lid right after the water bath. Let them sit over night and try again the next morning. If the lid still depresses, refrigerate that jar and eat the peaches within the week. If not, store them in a cool, dark place and eat throughout the winter!
Monday, July 6, 2009
Patriotic Fruit Salad
Wednesday, July 1, 2009
Crispy Cajun Chickpea Cakes and Creamy Cajun Rice
I got both these recipes from vegandad and decided to try them because my husband will love anything with the word "cajun" in it! I made them both on the same day and we had cajun night. Vegan dad had made them very mild so his children wouldn't revolt, and both recipes were very tasty but a bit bland. Next time I will add a bit more spice for us all, and alot more for my husband and I.
Crispy Cajun Chickpea Cakes
1 T oil
1/4 cup diced onion
1/4 cup diced green pepper
1 celery stalk, diced
1 can chickpeas, rinsed and drained
1 tsp thyme
1 tsp paprika
pinch of cayenne pepper (should have used more than a pinch)
1 tsp hot sauce (should have used a bit more)
2 T chopped fresh parsley
2 T flour
1 T cornstarch
salt and pepper to taste
Heat oil in a frying pan over medium heat. Saute onion, green pepper and celery for 5-7 minutes until softened. Remove from heat.
Place chickpeas in a food processor along with the onion mixture from the stove and pulse until chickpeas are no longer whole, but don't process them too much. I don't have a food processor (well, just a one cup size one) so I used my blender instead. This proved to be difficult because the blender could only pulse what was on the very bottom, leaving everything whole on top. I ended up scooping everything out of the blender and trying again with very small amounts each time. In this way I was finally able to pulse the entire mixture.
Place processed chickpea/onion mixture in a bowl and add spices, hot sauce, and parsley. Mix well. Add flour and cornstarch and mix well again. Place in the fridge for 30 minutes.
Heat oil in frying pan (or spray with non stick spray) over medium high heat. Shape chickpea mixture into patties and fry until crispy and browned, flipping a few times. If you have trouble forming the patties, add a bit more cornstarch to hold it all together.
Creamy Cajun Rice
2 T oil
2 T margarine (I skipped this and just used oil)
2 T flour
1 onion, diced
1 green pepper, seeded and diced
2 celery stalks, diced
2 bay leaves
1 tsp thyme
1 tsp paprika
cayenne pepper to taste
3 cups water
1 cup long grain rice (I used brown)
salt and pepper to taste
2 cups chopped seitan (optional and since I had no idea what this was, I skipped it)
1 cup soy (I skipped this also since I wasn't using seitan)
2 green onions, thinly sliced
1/4 cup chopped fresh parsley (I used dried)
Heat oil and margarine in large pot over medium heat. Add flour and stir constantly for a minute or so, until flour becomes a nice golden brown and has a nutty smell. Add onion, green pepper, celery and bay leaves. Fry for another minute. Add water and rice and mix well. Season to taste with salt and pepper. Bring to bubbling, then reduce heat and simmer, uncovered, until rice is cooked (about 15 minutes). Stir frequently. Add seitan, if using, and soy. Cook until liquid thickens a bit. Stir in green onions and chopped parsley. Adjust seasoning to taste.
Cost of chickpea cakes:
can of chickpeas 79 cents
pepper $1
onion 50 cents
celery $1
spices (?? less than $1)
approximately $2.59 divided by 7 people = 37 cents per person
Cost of creamy cajun rice:
pepper $1
onion 50 cents
celery $1
rice ~$1
spices ~$1
$4.50 divided by 7 people = 64 cents per person
Inexpensive, delicious and filling!
Verdict: Will definitely make again. The children all liked the chickpea cakes but really loved the rice, except for the diced pepper. Next time I'll chop those smaller. :-) My husband loved the meal and asked for more cayenne pepper next time!
Wednesday, June 24, 2009
Homemade Popsicles
Is it hot where you live? Want a nice cold treat for your children but can't afford popsicles from the store? And you don't have a set of popsicle molds for making your own? Not to worry. Just use an ice cube tray!
I buy frozen concentrate lemonade or cran-raspberry juice (or some other yummy flavor) when it's on sale, mix it up, and then pour some into ice cube trays. Cover with saran wrap (you need the saran wrap to hold the toothpicks up semi straight) and then stick a toothpick into each cube for the "handle".
Voila! Lovely, ice cold treats to enjoy on a hot day.
You can make dozens of these from one can of frozen concentrate. A cheap, fun treat.
Sunday, June 21, 2009
Pronto Pasta Bake
My friend Beth sent me this recipe to try and it was very good! It's similar to lasagna only with different noodles. I need to apologize to Beth right up front, as I kindof mutilated the recipe (misread the part about the cheeses) and used different noodles (the kind I had on hand), but it turned out well anyway and was devoured by my family!
Pronto Pasta Bake
12 oz rotini pasta, cook according to package directions (I didn't have rotini so used a mixture of macaroni and bowtie pasta instead). Drain.
2 medium zucchini, coarsely chopped
2 garlic cloves, pressed (I minced)
1 jar spaghetti sauce (I used 32 oz)
1 tsp basil
1/2 cup fresh Parmesan cheese, grated (I used Kraft, not fresh)
2 cups (8 oz) shredded mozzarella cheese
1 lb hamburger, browned (optional)
Preheat oven to 375. Combine garlic, zucchini, spaghetti sauce, and basil (and hamburger if using). In 9"x13" casserole pan layer noodles, spaghetti mixture, and then half of each of the cheeses. I messed up here and I mixed all the parmesan cheese in with my spaghetti sauce mixture and had just the mozzarella to layer with. It still turned out great!
Repeat layers with the remaining pasta, sauce, and cheeses. Cover with foil and bake for 45 minutes. Uncover and continue baking for 5 more minutes.
Verdict: My family really liked this! Two of the boys were not thrilled with the zucchini being in there, so I probably should have chopped them smaller. Next time I'll use my one cup food processor to make really small chunks. My husband loved it, and he ate the leftovers for lunch the next day. Will definitely make again. Thanks Beth!
Tuesday, June 2, 2009
Bran Muffins
Well, I was hoping to post something here while it was still May so I would at least have 2 posts in May, but that didn't happen. I have been focusing on finishing our school year well, and also on trying to exercise more regularly, so trying new recipes has taken a back seat for a time. I have wanted to post this recipe for a while though, because these are incredibly moist and delicious bran muffins! I used to think bran muffins were pretty much like cardboard until I tried these. This recipe is from Sue Gregg's Soups and Muffins cookbook, and we have enjoyed them for years.
Bran Muffins
Cover 1/2 cup of raisins with water and set aside to soften. This is an optional step and one which I usually skip.
1/2 cup very hot water
1 1/2 cups wheat bran
Blend together (I stir) and let stand for 5 minutes to soften bran
In large bowl, combine:
1 egg
1/3 cup honey
1 cup buttermilk (I use regular milk. For those with dairy allergies, use soy milk.)
When these ingredients are well blended, add:
1 1/2 cups whole wheat flour (or whatever flour you have)
1 1/4 tsp baking soda
1 tsp salt
Stir well and then add the bran/water mixture. It will look something like this:
Add raisins if using them, and blend just until raisins are mixed throughout. Fill muffin cups 2/3 full and bake at 350 for 20-25 minutes. This recipe only yields 12 medium sized muffins, so I frequently double it.
If the batter does not look quite moist, add a bit more buttermilk or milk or soy (whatever liquid you're using) and /or a bit more honey.
Verdict: My husband, me, and 2 of our children love these muffins. The other 3 could take them or leave them. But since they are loved by more than half the family, I do and will make them! :-)
Subscribe to:
Posts (Atom)