Saturday, February 28, 2009

Baking Bread

Several people have asked me how I bake our bread, so I thought I would devote a post to that subject.

After receiving a bread machine from my in-laws the Christmas that I was pregnant with our oldest, I immediately began using it to bake all our bread. My husband and I loved the flavor, texture, and the smell of the bread while it was baking! The downside was that it took 4 1/2 hours per loaf, but since we only needed one or two loaves per week, it wasn't too bad. A couple of children later, I couldn't keep up. I was constantly baking. And then I switched to whole wheat flour and I could almost smell the poor bread machine motor beginning to burn up from the effort. We completely ruined our "paddle".

So I put my beloved bread machine away and we ate store bought bread for a time while I researched bread-from-scratch recipes and did some soul searching to make sure this was a road I was committed to travel. Ultimately, I became convinced of the health benefits of freshly ground whole wheat flour, so we purchased this wheat grinder and a few pounds of wheat berries and I started grinding my own wheat to make flour and then mixing and kneading bread dough by hand (when we purchased ours it was right around $200, I see that it has gone up in price since then).


With my grain mill I could grind wheat into flour, mix it into bread dough immediately for the best health benefits, then knead and bake 4 or 5 loaves at once. It took me about 20 minutes to knead by hand, but I could have 4 or 5 loaves in about 3 hours total, as opposed to one loaf in 4 1/2 hours in my bread machine. We loved this bread even more! It is soft, delicious whole wheat bread, especially when fresh. Not heavy at all. I baked bread this way, kneading by hand, for another 2 or 3 years while saving money for a Bosch mixer.


I love my Bosch mixer! It is designed for daily use and for mixing whole wheat bread dough. In other words, it has a very powerful motor. I can use it for mixing just about any kind of dough or batter (including cookies), and I have the option of purchasing special attachments such as the one that makes cereal flakes! (the mixer pictured in the link is an updated model of the one I own). This mixer takes the place of my hand kneading, so it cuts the total time even further. In this picture the dough is nearing the end of its mixing time and pretty much fills the whole bowl.


The recipe I use usually yields 4 loaves, but this time I used part of the dough to make a stuffed sandwich so I only got 3 loaves of bread. Here it is starting its one hour rise time.


After rising for an hour, I bake at 350 for 30 minutes. And voila! Yummy homemade bread!


I let mine cool completely and then cut immediately into slices, wrap in saran wrap and specially sized bread bags, and freeze for use during the week. If I slice, wrap and freeze right away, later when we thaw a loaf it tastes just-made-fresh! I have learned through trial and error that double wrapping is important if I plan to freeze the loaves. This bread is wonderful sandwich and toast bread! I use the same recipe to make hamburger buns, but change it a little to make pizza crust.

Once the equipment is paid for, this is not only healthy bread but very inexpensive bread too! A 50# bag of wheat berries costs $27.50. From this I can bake 80 loaves of bread. Factoring in the other ingredients makes homemade bread slightly more than 34 cents per loaf, but still much cheaper than its store bought cousins! This is a tremendous savings for us right now, during my husband's unemployment. On many occasions I have found myself giving thanks for the bag of wheat berries in our basement!

For an interesting article on the fiber benefits of freshly ground whole grain flour, go here. And here is another one on the wheat germ properties of bread made from freshly ground flour, which can help ward off the common cold (maybe I haven't been eating enough bread the last couple weeks!).

Tuesday, February 24, 2009

Rotisserie Style Crockpot Chicken

This is another of Stephanie's crockpot recipes that I've been waiting to try. It was FANTASTIC. The meat was falling off the bone tender, and the flavor was just delicious. Every member of the family loved this chicken - hubby and all 5 children!! A winner!

Rotisserie Style Crockpot Chicken

1 whole chicken, skinned (4-5 pounds)
2 tsp kosher salt (if you'd like it as salty as the ones in the store, add another 1 tsp.)
1 tsp paprika
1 tsp onion powder (didn't have any so I left this out)
1/2 tsp dried thyme
1 tsp Italian seasoning (I substituted with my favorite brand of all purpose seasoning)
1/2 tsp cayenne pepper
1/2 tsp black pepper
pinch of chili pepper (Stephanie said it was "probably not necessary" but I used it anyway!)

--4 whole garlic cloves (optional - I did not use)
--1 yellow onion, quartered (optional - I did not use)

De-skin and wash the chicken. This makes your sink really gross, but it's a good excuse to clean it reeeeeally well afterwards. :-)

Combine spices and rub on chicken, both inside and outside. If desired, stuff cavity with optional garlic cloves and onion. Set in crockpot, breast down. Do not add water.


Cover and cook on high for 4-5 hours or on low for 8. I cooked a 3-4 pound chicken and it fit perfectly in my 5 qt crock. I was using my other crockpot for something else at the time, so it had to. (I am so thankful I have two! I often have them both going nowadays). I have never liked the look of crockpot cooked chicken ~ it's just so pale compared to rotisserie chicken at restaurants. But I forced myself to look past the color and concentrate on the taste, and this tasted SO good! It was very tender and moist and flavorful.


I saute'd some peppers, zucchini, onion and mushrooms in spices and a bit of olive oil to eat with the chicken. Delicious! (the children also had applesauce and slices of bread). The chicken portion of this meal cost less than $4 and we all ate until we were satisfied!

Saturday, February 21, 2009

Crockpot Baked Oatmeal Bars

We ran out of bars last week and I decided to try this crockpot baked oatmeal recipe from crockpot365 (and in case you've never visited Stephanie's blog, she was just on Good Morning America and posted about that experience on her blog today! Plus she has lots of fabulous recipes - check it out!). I normally buy a large box of Nutrigrain bars at Sam's Club and we eat them as snacks on Fridays during co-op. Co-op is a long morning and by the time we finish it has been about 4 1/2 hours since breakfast. So during second hour all students are allowed to eat a snack. Because of the $500 food budget challenge this month, I didn't want to go buy more Nutrigrain bars, and this was just the excuse I needed to try Stephanie's recipe.

Crockpot Baked Oatmeal

3 cups rolled (not instant) oats
1/2 cup brown sugar
2 tsp cinnamon
2 tsp baking powder
1 tsp salt
2 T flax meal (optional, and I left this out because I didn't have any)
1 cup milk
2 eggs
2 tsp vanilla
1/4 cup butter, melted
3/4 cup dried fruit (I left this out because I wasn't sure my kids would like it)

It was with high anticipation that I combined all the ingredients into the crockpot, achieving the described consistency of slightly runny (not goopy) oatmeal.


I cooked on low for 3-5 hours (my time was almost exactly 4 hours) and then checked for doneness. Stephanie said it would be done when the edges are brown and beginning to crust like this:


Yep! Edges were crusting and a knife came out clean from the center. It was done! I let it cool for 2-3 hours before attempting to cut. That is where it got tricky. I don't know if I did something wrong or if it is supposed to be crumbly, but it was not bar-like, it was more like oatmeal cake. It made it a little trickier to eat than I had envisioned (we really needed spoons) but the taste MORE than made up for the crumbs. It was as delicious as Stephanie said it would be!!! This tastes hearty and not as sweet as store bought bars, but it's not bland. My husband described it as, "knowing you are eating something that's really good for you, and liking it."

I gave each child two pieces of this "cake" in a tupperware container along with a few chocolate chips and slices of banana. Oh yes, and a spoon. :-) It was a delicious snack that all but son L enjoyed!


Verdict: My husband wants me to make it with raisins next time. I am already imagining all the various dried fruit options I can experiment with in this recipe!

Thursday, February 19, 2009

Macaroni and Not Cheese

This is a recipe I got from my friend Jennifer, and it was really delicious! The children did not see me make this, and I called it mac and cheese, so they had no idea there was actually no cheese in this dish. The cheesy color comes from cooked and pureed carrots and potatoes. I chose to leave meat out this time, but you could easily add ham or pork for a meat flavored variety. The kids loved it! We had it with steamed broccoli and the rocky mountain muffins I made the other day. Yum.

I have to admit, it was a bit labor intensive. It took me an hour to get it in the oven, and then it had to bake for nearly an hour. But that could be due to it being my first time to make it. One redeeming factor is that the recipe for the sauce makes double, so I now have 4 cups of sauce in my freezer ready to go and next time it will just require boiling the noodles and assembling the dish.

Macaroni and Not Cheese Sauce

3+ cups potatoes
3+ cups carrots
1 cup potato water
3 cups milk (or 1 1/2 cups milk and 1 1/2 cups water)
2 T oil
2 tsp salt
1 tsp Lawry's
1 tsp Mrs. Dash - original blend (I did not have either Lawry's or Mrs. Dash, so substituted with 2 tsp of my favorite "Possum" all purpose seasoning, which has no MSG)
4 T lemon juice (I didn't have any so left this out)

Peel, chop and boil potatoes. Cook carrots in steamer. When potatoes are done, reserve 1 cup of potato water. Drain the rest. Mix the milk, water, and oil with the potato water. In blender, alternate batches of veggies (cooked carrots and potatoes) and liquids. When all the veggies and liquids are blended, add the seasonings to complete the sauce. It will be quite orange in color but it tones down considerably in the oven! You will use approximately half of this sauce (3-4 cups) for one batch of this recipe. Freeze the rest for later use.

Macaroni and Not Cheese Assembly

Meanwhile, cook 3-4 cups of macaroni noodles. Drain. In a large bowl combine the cooked noodles, sauce, 2 beaten eggs, and meat if desired. Stir and pour into casserole pan. Cover with bread crumbs (or if you're me, your delicious Pepperidge Farm Herb Stuffing Mix!) and drizzle one stick of melted butter on top. Bake at 350 for 45-60 minutes, depending on your oven temp.


Verdict: Fun to make (I love using my blender!) , loved by the children, and a good way to sneak in some veggies. A winner! Thanks Jennifer!

Wednesday, February 18, 2009

Rocky Mountain Muffins


Oh my goodness, these are so good!! They are from so many bunnies' blog, and are really leftover oatmeal muffins, but they decided to call them rocky mountain muffins because of the way they puff up in the oven. I didn't experience a huge puffing up in the oven, but they are lumpy looking on the surface because of the oatmeal, so I think the name fits! I'll give you her original recipe first and then tell you of the changes I made.

Rocky Mountain Muffins

2 1/4 cups white flour
2 1/4 cups wheat flour
3/4 cup leftover oatmeal
3/4 cup packed brown sugar
1/2 tsp salt
2 T baking powder (yes! 2 Tablespoons!)
1 cup milk
3/4 cup oil
3 eggs
cinnamon sugar for sprinkling on before baking

Mix all ingredients except cinnamon sugar in large bowl. Spoon into greased muffin tins. Sprinkle with cinnamon sugar. Either freeze or bake. If frozen, bake at 350 for 20 minutes. If fresh, bake at 350 for 15 minutes.

Here's what I did differently. I had well over a cup of leftover oatmeal from breakfast the other morning, but it wasn't oatmeal from the pan, it was the bits of oatmeal leftover in the bottom of everyone's bowls. If you think that's gross, I'm pretty sure the intense heat of the oven killed every possible germ that might have been in the there from my children's mouths. And if it still grosses you out, just don't eat rocky mountain muffins at my house! Because it was from the bowls and not the pan, it already had some milk in it. And because it was well over the called for 3/4 cup, I added things slowly and went more by the consistency than a strict following of the recipe. I can't do this with everything, but I've made enough muffins in my lifetime to know what a good muffin consistency looks like.

Instead of 2 1/4 cups of white flour and 2 1/4 cups of wheat flour, I added 3 cups of flour (it was white, though next time I'm going to try some whole wheat pastry flour) and 1 cup of dry oats. I love to substitute oats for flour whenever I can.

I used 2 eggs instead of 3, and I added the milk slowly and just stirred until it looked right, and ended up using less than 1 cup.

I also had to bake these for 20 minutes rather than the called for 15. My oven must run cooler than Mrs. Bunny's (Kathryn's) oven, because every recipe of hers that I've tried so far, I've had to increase cooking time.

The children could not WAIT to try these!! Everyone had one before bed and they were declared "delicious"!

Tuesday, February 17, 2009

Black Bean Burritos


These tasted much better than black bean quesadillas according to my children (black is not their favorite kind of bean). Easy to make and well liked by all! Yay! This recipe is from Crystal at the Family Homestead. During the month of January, while I was planning and preparing for a small food budget in February, I decided to invest $8 in Crystal's ebook, "How to Cook with Beans." It was $8 well spent! She gives lots of tips for how to soak and cook beans, as well as pages and pages of recipes. I chose this one first because I have lots of cooked black beans in the freezer, and I thought the addition of shredded carrot would be interesting (my family could not find or taste the carrots, but it made me feel good knowing they were in there!).

Black Bean Burritos

6 cups of cooked black beans
2 cups salsa
1 cup shredded carrots
8 oz cream cheese
6-8 whole wheat tortillas (or white, whatever you have)
shredded cheese

Combine beans, salsa and carrots in pan and simmer for about 15 minutes to allow carrots to soften.


While bean mixture is simmering, layer tortillas in the bottom of casserole pan.


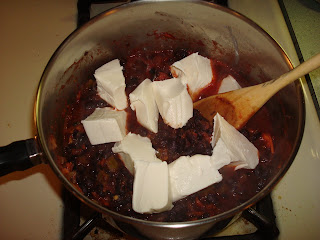
When carrots are soft, add cream cheese.


Stir to combine well, and cook just a few minutes more so that the cream cheese completely melts into the bean mixture.


Layer bean mixture on top of the tortillas, and then a layer of shredded cheese. Continue layering tortillas, bean mixture and cheese until you run out of bean mixture or pan, whichever comes first!


Bake at 350 for about 20 minutes until cheese is nicely melted and bubbly. Serve with sour cream and salsa.


Verdict: Well liked by all, loved by some, will definitely make again!

Saturday, February 14, 2009

Pork Tenderloin in Honey Mustard Sauce


This week I picked up half a pork tenderloin for $8. That was about half price. When I saw the price of the meat in the sale flier, I realized that psychologically I am still thinking/shopping like a meat eater, despite the fact that we have begun to eat vegetarian at least half the time. Even though I could buy bags and bags of beans for $8 (which I already have lots of in the pantry I might add!) I could not resist the lure of purchasing meat for such a good price. I also bought chicken breasts (buy one get one free). So our grocery store gift card countdown has gone down considerably this week. While in the store I actually debated quite a bit about these purchases. Good deals notwithstanding, I *could* use that same amount of money on other items and make it stretch even further. But since we are not a 100% vegetarian family, I decided to be thankful for the good price on meat, thankful that we had the means to purchase it when it was on sale, and just enjoy it! (my husband says I over analyze sometimes ~ and he's right! But in my defense, I'm just trying to make this gift card stretch as faaaaar as possible!)

I cut the pork tenderloin into thirds and used one third tonight to make pork tenderloin in honey mustard sauce for our Valentine dinner. It was delicious! With meat for two more meals in the freezer, that works out to be $2.66 per meal, which is a pretty good price for pork tenderloin!

Pork Tenderloin in Honey Mustard Sauce

Cut pork tenderloin into thin chops (or bite sized pieces - your choice) and brown lightly in a small amount of olive oil. When both sides are browned, add 3/4 cup honey, 1/2 cup mustard, 1/4 tsp chili powder, and 1/4 tsp salt. Stir ingredients and swish pork chops around to make sure they are covered. Cover pan and let simmer for about 15 minutes. This makes a really tasty sauce, so you can serve the pork alone or spoon it and the sauce over rice.

We enjoyed it for our Valentine's Day feast!


Thursday, February 12, 2009

Salmon Fillets in Orange-Honey Marinade

After several days of eating vegetarian, I sensed it was time to feed my family some meat. Checking the freezer I found salmon fillets purchased pre-layoff, and we all love salmon! This recipe is one we have used for years, and is from an old "Kingsford - Great Barbeques" cookbook ~ you know, "Kingsford" as in Kingsford charcoal for grilling? It looks more impressive if the photo is not blurry and if the salmon fillets or steaks are grilled or broiled. But my broiler is currently not working so these were baked and the flavor is still absolutely fantastic!


1/3 cup orange juice
1/3 cup soy sauce
3 T oil (I use EVOO)
3 T ketchup
1 T honey
1/2 tsp ground ginger
1 clove garlic, sliced or mashed in your garlic press
4 large salmon steaks, or 8 smaller salmon fillets

In shallow glass dish (I use a 9x13 casserole) combine all ingredients except salmon. When well stirred, add salmon, turning to coat both sides with marinade. At this point the original recipe calls for covering and refrigerating for one hour before cooking. I have done this but then feel questionable about using the marinade that the raw fish have been sitting in and it is SO good you just don't want to waste it! So what I usually do is to bake or grill immediately. The flavor is sooooo good! If I serve this with rice, my family will often pour some of the salmon marinade (after cooking) on top of their rice.

Here are the salmon fillets about to go in the oven.

I bake at 350 for 20 minutes per side. When broiling I usually broil about 5 minutes per side and then check. We haven't grilled these since last summer so I don't remember the grilling time per side. This recipe is so flavorful without being overpowering, it is how I introduced salmon to each of our children when they were 1 or 2 and they all love it! In fact, we got a kick out of the fact that when our daughter turned 9, her requested birthday dinner menu was salmon, baked potatoes, and tossed green salad.

Tuesday, February 10, 2009

Yogurt in the Crockpot - Third time's a charm! (sort-of)

On my third try of making yogurt in the crockpot, I added 2 T of unflavored gelatin (found in the jello aisle) at the 5 1/2 hour mark, when you are stirring in the 1/2 cup of store bought yogurt with live active cultures. Then I let it sit for the required 8 hours, and when I took off the lid and peeked inside....voila! Firmed up yogurt! I was so pleased. (for original directions on making yogurt in your crockpot, go here.)

Unfortunately, adding flavoring reduced it to the consistency of yogurt drinks again. So I either need to accept that I can only make yogurt drinks, or need to keep experimenting with ways to add fruit without making it thinner. I am storing this batch in glass canning jars in the fridge and flavoring little amounts of it right before eating. So far we have made peach yogurt (adding one whole canned peach to 1/3 of the blender pitcher full of yogurt) and blueberry yogurt (adding about 1/2 cup of fresh blueberries to the same amount of yogurt). Both were good, but the blueberry flavor was the biggest hit.


Fortunately the children are amazingly willing to drink down all my experiments!

Creamy White Bean and Apple Chili


This was delicious! A different take on chili. We ate it without meat, but if you wanted to add chicken or turkey, they would both work well in this recipe. I got it from the crockpot lady over at crockpot365.


2 cans of white beans, drained and rinsed (I cooked a whole crockpot of black eyed peas last weekend and then froze them in ziploc sandwich bags. If you do this, just pull out one bag full. They can be any kind of white bean, I just happened to have black eyed peas so that's what I used.)
1 onion, chopped
2 apples, cut in tiny chunks, no need to peel
3 cloves garlic, smashed and chopped
3 T butter (first time I've ever put butter in my crockpot!)
2 tsp chili powder
1/2 tsp ground thyme
1 tsp cumin
1/4 tsp salt
1/4 tsp pepper
3 cups vegetable or chicken broth, depending on whether or not you want this to be a vegetarian meal (I used vegetable, and I added a bit more because 3 cups didn't look like enough)
1/2 cup plain non fat yogurt
shredded cheese (optional ~ add after cooking, while serving)

The crockpot lady suggests using any crockpot over 4 quarts. I used a 6 quart crockpot and wish that I had doubled this recipe. It made enough to feed our whole family, but just barely. My husband loved this and was disappointed there were no leftovers to eat for lunch this week.

Put the butter in the bottom of your crockpot. Dump in the drained and rinsed beans. Chop up the onion and apple and add to pot. Add the spices and pour in the broth. Stir in the yogurt (be sure to stir this in well! there were little globs of yogurt floating in my broth because I didn't stir this in good enough. it didn't affect the flavor, but they looked strange). Cover and cook on low for 8 hours or high for 4-5 (mine was done in 4). This is done when the onion has reached desired tenderness and the flavors have melded. Stir in the cheddar cheese before serving (I sprinkled a little cheese on the tops of the individual bowls). We ate some of my homemade bread with this chili, but any hearty bread or muffin would work great. The spices gave this just enough "kick" to taste really good, but not too spicy that the kids wouldn't eat it. And the cooked apple pieces were a nice texture. No-one knew they were apples until I told them!

Verdict: My husband, myself, and 3 of the children loved this. Two of the children tolerated it. I will definitely make this again!

Blueberry Corn Muffins


I got this recipe from the Sue Gregg Soups and Muffins cookbook. I own two of her cookbooks and they are excellent because not only are they full of good recipes, they also have several pages of tips for how to cook/bake gluten free, how and what to substitute, how to make your own broth cheaply, etc. She has a whole set of Eating Better Cookbooks. Someday I'd like to own all 8 of them!

Blueberries were on sale for $1 box a couple weeks ago so I bought several, and I thought this recipe might be a good way to use up the last box. Personally, I loved the taste of the corn and blueberries together. It was different. And they were moist! I hate it when baked goods turn out dry and crumbly, which has often been my experience with cornbread. The rest of my family gave them mixed reviews, however. They liked them, but not as well as "regular muffins".

Blend together:

2 eggs
1/2 orange juice
1/4 cup honey
1/4 cup oil
1 tsp lemon extract (I didn't have any so left this out)

Blend dry ingredients together in separate bowl:

1 1/2 cups flour (she calls for whole wheat but you can use whatever you have)
3/4 cups cornmeal
2 tsp baking powder
1/4 tsp baking soda
3/8 tsp salt (I thought this was a weird measurement! who has a 3/8 tsp??)

Blend dry ingredients into liquid ingredients just until mixed. Gently fold in 1 cup blueberries, fresh or frozen (I used fresh). Bake at 350 for 18-20 minutes.

When I mixed the dry and liquid ingredients together, it didn't look like very much batter in the bowl. So I baked them in a tiny muffin cup pan so they would look like more than they were. Does anyone else do things like that?

Verdict: Because most of my family did not love these I probably won't follow the recipe exactly if I make them again. Four of the children said they liked the muffins, but not the blueberries. The presence of the blueberries made them think they were going to taste like regular blueberry muffins, and then they were disappointed when they didn't. One of the children loved the blueberries, but not the muffins. So in the future I think I will make these as just plain corn muffins and leave the blueberries out.

Monday, February 9, 2009

Zucchini Bread


Our son C was feeling well by Sunday, but he had not been fever free for 24 hours so he and I stayed home from church and baked zucchini bread together. He is such a great little helper! We had a lot of fun working together in the kitchen, and the family loved our efforts. It was completely GONE within 24 hours!

I love my zucchini bread recipe because it's so moist, so even though there are a plethora of zucchini bread recipes floating around out there I'm going to post mine too. This is from my dear Grandma Frena, who is now in heaven.

Stir together:

2 cups sugar (I add one and a half)
3 cups flour
1 tsp salt
1 tsp soda
4 tsp baking powder
3 tsp cinnamon

Add:

3 eggs well beaten
1 cup oil
2 cups shredded unpeeled zucchini
3 tsp vanilla

Mix well. Pour into greased loaf pan(s). Bake at 325 for one hour. You can double this recipe for 3 standard loaves.

Thursday, February 5, 2009

Sweet Potato Pancakes


Much of my meal planning right now consists of buying whatever veggies are on sale super cheap and then figuring out later how to cook them. Tonight we had such a meal. It was delicious and a hit with everyone! I LOVE when that happens! I went searching for a way to incorporate sweet potatoes as the main part of our meal, and found this recipe for sweet potato pancakes on allrecipes.com.

3/4 pound sweet potatoes (I cooked 3 large ones)
1 1/2 cups flour
3 1/2 tsp baking powder
1 tsp salt
1/2 tsp ground nutmeg
2 eggs, beaten
1 1/2 cups milk
1/4 cup butter, melted

Put sweet potatoes in a pan of boiling water and cook until tender but firm, about 15 minutes (I found I should have boiled them much longer - they were soft on the outside but very hard to mash). Drain and immediately immerse in cold water to loosen skins. Drain, remove skins, chop, and mash.

In a medium bowl, sift together flour, baking powder, salt, and nutmeg. Mix mashed sweet potatoes, eggs, milk and butter in a separate medium bowl. Blend sweet potato mixture into the flour mixture to form a batter.

Cook pancakes in whatever method you normally use.


Here's what I did differently and what I would do differently next time:

I didn't cook the sweet potatoes long enough to be easily mashed, so the pancake batter turned out to be fairly lumpy with small chunks of sweet potato clearly visible. This visual was not a happy thing for my children.


Once they were flipped it was a little better, because the chunks were not visible. They loved the taste, just not the chunks. So I will cook longer and mash better next time.


Also, I doubled the recipe to make sure we had enough for our larger sized family. This would have meant 3 cups of flour. Instead I added 2 cups of flour and 1 cup of oats (I used regular oats, but you could use quick cook or whatever you have). In addition to all the ingredients listed above, I also added 1 tsp of cinnamon and 1 tsp of pure vanilla extract. I also added the milk slowly, stopping when I felt the batter was the right consistency. This turned out to be less then the called for amount of milk.

They were thick and "hearty" (as my hubby said) and very, very good. Definitely a keeper!

Wednesday, February 4, 2009

Banana Muffins and Chocolate Chip Banana Muffins

For years I have used a delicious banana muffin recipe that I got from my sister Gayle to use up over-ripe bananas. The muffins always turn out incredibly moist and delicious, and are eaten up literally faster than I can make them. A few weeks ago I found another banana muffin recipe online which called for small chocolate chips. I decided to try it, because, who doesn't love chocolate chips??? :-)

I'll share the recipes with you and then tell you the verdict for which one my family members preferred.

Chocolate Chip Banana Muffins (from somanybunnies blog)

1 cup sugar (I used sucanat instead, same amount)
1 egg
1/2 cup butter, room temperature
2 ripe bananas
3 T milk
1 cup whole wheat flour (can use 2 cups of whole wheat, or 2 cups of white, whatever you have)
1 cup white flour
1 tsp baking powder
1/2 tsp baking soda
1 tsp salt
1/2 cup small chocolate chips


Preheat oven to 375. Grease muffins tins. Cream butter and sugar for 3-5 minutes (I just stirred with a whisk instead). Add egg. Add bananas, mashed. Alternate adding dry ingredients and milk. Finally add chocolate chips. Scoop into muffins cups and bake for 10 minutes or until done (I found this was not nearly enough time and baked for closer to 20 minutes). OR, put muffin pans in freezer until batter is frozen, then put in ziploc bags and store in freezer until you are ready to bake them.


Banana Muffins (from my sister Gayle - sorry no blog! I wish she had a blog, she is amazing)


2 large bananas, mashed (I often use 3 instead)
Add 1.5 cups sugar (I add just under 1, and this time I used sucanat instead of white sugar)
Add in 1/2 cup butter, softened
Beat these together
Add 2 eggs
1/2 cup sour cream (I have skipped this whenever I was out and they still turned out great)
Beat
Spoon in:
1 tsp baking powder
1/2 tsp baking soda
1/2 tsp salt
2 1/4 cups flour

Stir til well mixed. Spoon into muffin tins and bake at 375 for 20 minutes.

Since I used sucanat for both recipes this time, they turned out darker in color than they do when I use white sugar. With white sugar they are more golden in color.


I made each of these recipes a few days apart and then asked each member of the family which they preferred. Here are the results:

Husband: "I like them both, but I think I prefer the original recipe because it's so moist."

Daughter G: "I like them both but I think I like the first one a little bit more."

Son G: "I like them both the same."

Son L: "I like the chocolate chip one a little better."

Son C: "I like them both!"

Little Man: "I like them both too!"


So there you have it. Two winning recipes! You know what they say.....variety is the spice of life!

Sunday, February 1, 2009

Black Bean Quesadillas


We had these for dinner while watching the Super Bowl tonight. Our 8 year old son remarked halfway through the game, "we usually have chips and snack food during the Super Bowl. But we probably had no money and you were sick, so you couldn't go to the store for that stuff, right?" Right honey. :-)

These were not as popular with the whole family as the taco style lentils and rice. My husband, daughter G and son L loved them. Sons G and C liked them "a little" (their words). Little Man did not like them at all, and ate most of one quesadilla under duress.

This is Sabra's recipe from Sleeplesssabra.

Approximately 1 cup dry black beans - or 2 cans from the store

1/2 jar mild salsa (you can use a stronger salsa but they have quite a bit of flavor already)

Ground cumin (1 - 2 Tbsp)

Fresh cilantro (one bunch)

Shredded cheddar cheese

Tortillas

Sour Cream

Simmer the dried black beans for a few hours until they're just soft. If you use canned beans just drain and rinse them to remove the excess sodium.

Once your beans are cooked place them in a large bowl. Add a tablespoon of ground cumin and also a little salt to taste. Then, add in half of a jar of salsa. I prefer to leave my beans whole but you can also mash them a little if you want to change the consistency for your kids (that can also help keep the beans from rolling out of the tortillas). Then, chop and add the fresh cilantro and mix it all through.

For the last step, take a tortilla and place a layer of the bean mixture over one half of it (you are going to fold it over) and cover the beans with cheese. Fold the other side of the tortilla over it so it makes a half-circle and place it in a skillet over med-high heat. Toast it and flip it to toast the other side (just enough to heat it through and melt the cheese). Place it on a plate and top with sour cream.

The cumin and the cilantro really make this dish. It's just full of fresh flavor.

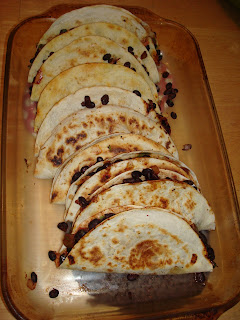
After we cooked a few in the skillet, we added them to a pan kept warm in the oven, so they would all be ready at the same time.


Inside you can clearly see the beans, cilantro, and salsa, with melted cheese on top.


A filling, delicious, and inexpensive vegetarian meal!